How Do I Update Content On My WordPress Website?
We always, always, always build websites in a way that is super-user-friendly for our clients. We want our clients to be as independent as possible, relying on us to make website updates only when there are some “heavier” programming changes needed. But for routine day-to-day content and copy updates, those tasks can be handled directly (and easily) by our clients themselves.
Recently when speaking with a prospective client, the following (paraphrased) question was asked: “I understand that we will be able to update content on our own, and I understand that this will be accomplished via WordPress. But how do we specifically do that?” This was a terrific question, and it was an opportunity to discuss the different ways we customize WordPress Admin pages, options, plugins, etc. so that everything is super-easy and straightforward for those individuals who are making copy and content updates to their website.
There are many ways to customize the WordPress Admin experience. To keep things tidy, we’ll briefly describe the 3 primary methods that we use here at Torx. (Don’t forget to click on the thumbnail images below to view larger versions!)
Default Page Editor
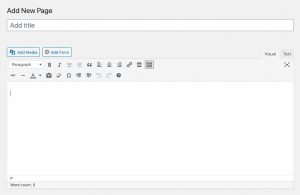
 These days, we rarely go the Default Page Editor route, but it is still an option for smaller websites (and smaller budgets). The Default Page Editor doesn’t have many bells and whistles, but it does enable quite a bit of freedom (for good or for bad) when making content and copy updates.
Simply assign a title to your page, and then use the big WYSIWYG (“what you see is what you get”) editor to add whatever kind of content you’d like. In a similar manner to Microsoft Word, you can apply formatting to your text (bold, italics, lists, links, colors, etc.) by clicking the various rich-text formatting buttons located at the top of the editor.
This option is fine for really small websites with very little content. But it is not an optimal solution for larger sites that have big individual pages with lots of content, different sections, varying layouts, etc.
Custom Post Types
 Writing about Custom Post Types could easily be its own blog post because they’re very powerful. The way we typically explain Custom Post Types is like this: For those sections of your website where you have content or copy that is repeatable, we’ll use Custom Post Types. (What in the world does that even mean?!)
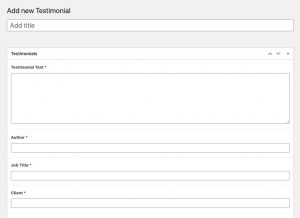
Here’s an example. On the Torx website, we have a section where we display testimonials that our clients have graciously sent to us. There are a bunch of these. We created a Custom Post Type called “Testimonials,” and when it comes time for a new testimonial to be added, that process is very streamlined. Instead of a big text editor like the Default Page Editor option, when we add a new testimonial, we just fill in the blanks, so to speak. There is a field for “Testimonial Text,” a field for the “Author” (the person who we’re quoting), and that person’s “Job Title” and “Company.”
We’ve already completed the down-and-dirty programming that enables the testimonials to display in a certain format and layout to website visitors. All that is necessary to add a new one to the site is to fill out the customized input fields on the “Add New Testimonial” page in WordPress. We take this approach so that we don’t have to worry about a page’s layout and formatting when new content is added. The already-completed programming will handle the layout and formatting of the new content. Just fill in the blanks, sit back, and relax.
Flexible Content
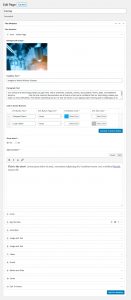
 The Flexible Content option is the most powerful method for customizing the WordPress Admin experience. It is similar to the Custom Post Types method, as it enables our clients to simply “fill in the blanks” to add content and copy to their websites. What makes Flexible Content super-powered though, is that it’s constructed in a way that enables website admins (our clients) to also control page layouts on different pages throughout the site. We typically explain Flexible Content as the process of selecting “building blocks” and then stacking them on top of each other.
We’ll provide another example because this is a semi-abstract concept. Imagine you need to add content to your new website’s Home page. You might want the top-most part of the page to be your “Hero” section. (Maybe a large browser-wide background image with bold headline text that is centered in the middle.) Under the “Hero,” you might want a section to display service/product icons and descriptions. Under that, a big text box… then an accordion section…and then some sections that display a combination of text and images…and so on, and so on.
With the Flexible Content option, we program all of these “building blocks” so that our clients have a nice big library of different layouts and content options to select from. When comparing Flexible Content to the other options (Default Page Editor and Custom Post Type), it’s essentially the best of both worlds. The filling-in-the-blanks process is very user-friendly, and the “building blocks” concept enables our clients full control of the layout and flow of each individual web page.
Selecting The Right Tool For The Job
WordPress used to be a one-trick pony many years ago, but it has certainly turned into an incredibly powerful content management system. With so many administrative tools and options available for WordPress-powered websites, the trick is figuring out what tools to use for the job at hand. That’s the role we play.
Our clients don’t need to learn how to build Custom Post Types or Flexible Content, but it’s important to know that these options exist. Our job is to build the highly-customized WordPress Admin experiences that are tailored specifically to each individual client and project.
If you’d like to learn more about our services, give us a call at 804-577-8679 or fill out the short form below.